Wednesday, February 27, 2013

Kristen: Gauging a Skirt

I really have tried lately to continue working on the dress. It wasn't until a sewing party that I held at my house...that I actually really got to work! I think it is important to use these sewing times for polite conversation, modeling for the younger girls, and the exchange of sewing skills.

 And food. Healthy food! And pizza bread...

Ladies have come together to sew forever! The six ladies who sewed with me were just that-ladies. And we didn't all just work on Civil War projects! One woman creates miniatures, Carrie started a t-shirt quilt blanket, and the younger girls worked on a braided/cut up shirt that I've seen all over pinterest. Overall, it was a wonderful experience, one that I hope to have again in the future!

Carrie did an excellent job! This is a quick shot of my sewing room!

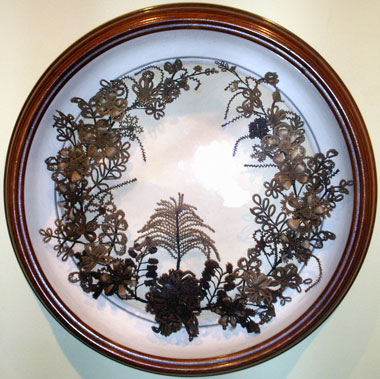
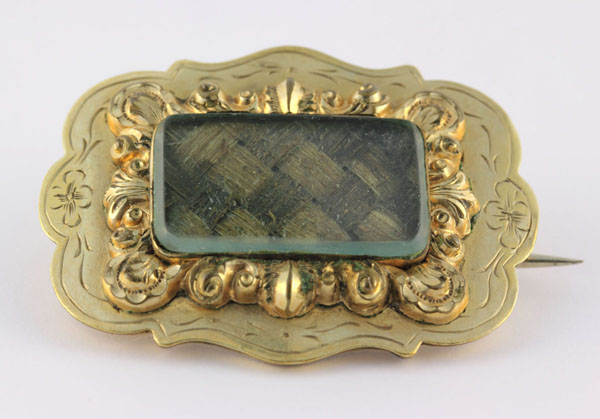
I've been working on many side projects including my hair jewelry. However, I need a dress to wear it with! I still want to complete one more before Greenfield Village this year, so hopefully I can get that done soon. As for gauging my skirt, that took longer than I expected. The process was eerily similar to doing the gathers on my bodice, with a few slight adjustments. First, you need to do two running stitches after turning down a 1 inch hem. Make sure the outside stitches are longer than the inside.

It will look bigger than your waist at first!

Then you push the gathers together, trying to make them and even 32 inches (GASP! MY WAIST SIZE!). It helps to mark the fabric at the half and quarter points to make sure the gathers are even. Here is a better picture, if it helps.

If you are looking for another tutorial, check out The Sewing Academy's compendium page, which is helpful for many different projects (http://www.thesewingacademy.com/the-compendium/). These ladies really know what they're talking about, and their dedication to historical accuracy is astounding. One day I hope to meet a few of them...*exaggerated sigh* In the meantime I will have to stay surrounded by my ribbons and fabric.

 I set out a few of my books in case we needed a reference

I took out my ribbons/silk, as well as my stash of 100% silk satin ribbon from Habermans!

The girls thought it would be clever to give Rambo a scarf; he didn't like it!

 It helps if I create a list that I can check off, so here is my list before I post again!

1. Finish attaching the waistband of mourning dress.
2. Start the hem.
3. Gather the sleeves.
4. Attach the sleeves.
5. Begin the cuff.
6. Do 3 practice rounds of hairwork gimping.

Until next time! Thank you for reading!

~Kristen


Monday, February 25, 2013

Becky: Wrapper Update


With a little (or A LOT) of trial and failure... I decided to cut the top of the front piece because I have a limited amount. The pieces are still pinned, but I am getting some work done. :/ 

Sunday, February 17, 2013

Kristen: Bodice Gathering, Waistband, and Piping Application

Another exhausting week! I think my students are able to smell my tiredness, and of course I have papers due just when I want to sew/craft! If only there were several of me, one to go to work, the other to class, and myself to just sit around and sew things.

And maybe finish working on my car. I need a new axle shaft still!

On another snow day this week (which was completely unnecessary) I found time to visit Becky to continue working on my mourning dress (which sadly, I have neglected for hairwork). I was avoiding it because I knew that I had to pull out the gathered waistband in order to regather to fit my shrinking waistline (yay!) Luckily for you readers, you will now get to see the process as shown to me by dear patient Becky.

2 strings next to each other. Knot together when pulled to correct gather

When you are finished with that part, make sure to tie the threads together. Maybe even check your fit by trying it on. I wish I would have done that the first time! Next, you'll move on to attaching the waistband. This is the way that I do it, followed by a crude drawing on paint in case it is still an issue for you.
 Lay out your waistband and newly gathered bodice

Start lining up the waistband on both sides

Pin neatly on both sides 

Run through with a basic stitch, and it should look nice and neat

And if you still can't visualize, here is a crude drawing

I should not have put that off. It was easy! I hope the picture helps too. I know when I first started sewing, I would read some of the instructions like they were in Greek. (I can read Spanish, but it's a no-go on Greek). Next I moved on to adding the piping, which again I thought would be so difficult that I would intentionally stab myself with needles to get out of doing it.

Here is that lovely piping I already made

Here it is lined right on the outside arm hole
You can't see, but the piping crosses at the dip in the arm hole

I just did an obscene amount of sewing today. I also learned how to gauge the skirt, but that will have to wait for another day! Looking back at my old posts, I wanted to at least finish my list before I posted next. Well, it sort of happened. At least I didn't wait several months, like I might have done in the past.

1. Re-gather the bodice to make a better fit Yay I did it!
2. Add the waistband Take that you silly waistband!
3. Finish creating all piping Puny Piping Problem Pulverized!
4. Start the armscye piping I call it an arm hole, but I know what I'm saying

I like lists. I like crossing out finished lists even more! I am lucky to have a patient Becky, nimble fingers, and a supportive audience. Thanks for reading!

~Kristen

Monday, February 11, 2013

Kristen: Hairwork Technique of Gimping

Hello fellow readers! Since I have gotten so much positive feedback on my hairwork post, I thought I'd continue with another about the basic technique that is used in most hair wreaths/boxes. I am of course talking about gimping.

Most of the little loops and curls and finished in the deceptively difficult process called gimping. Before I could even begin, I had to do a little research to find some instructions. I stopped at www.hairwork.com. The first basic tutorial that pops up is for "Hair Flower Instructions." If you are at all interested, spend the $5 and they'll send you a little history and a few pages of instructions with pictures. Seriously, I recommend buying this. 

Very helpful!

The instructions seem easy enough at first: "It is really nothing more than a row of hair loops wrapped over a knitting needle with wires crossed under each loop holding it fast to the needle." Alright, (I thought), simple gimping. There is no way I can mess this up!

I am of course referring to the last gimping fiasco. Thankfully no one was hurt...

I will prevail! This time I made a point of having a dry, steady hand. Now I will include basic instructions (still...buy the instruction packet...I can only do so much). 

First, cut and halve your wire

Then make a little loop around the metal rod

Twist a few times

Then lay it out like this

Make a loop with the thread

Twist the wire

 Repeat!

And repeat some more

 It will look like this when its finished. Then pull it off...

 And ta-da! A big mess of string!

That you will form into a ball to attempt to make a flower

This time though, I studied my technique and went a bit slower. I realized that I wasn't completely crossing the wire underneath the string, so it flailed around everywhere. Also, since I left string at the beginning and the end, even the smallest of tiniest of movements tugged the whole line out of place. Instead of getting frustrated, I decided to get even.

This time, cleaner loops. I also worked in the extra thread. 

I was more careful pulling it off the metal. 

I see (small) improvement

I knew this process would be a large undertaking, so I am content to simply let this be today's work. Back in the time when this was popular, a young lady would learn this from a family member who would pass the skill to future generations. I imagine that it took more than a few lessons to get it just right! I will try to practice at least once a day and see my progress over the next few weeks.

I must be careful to remember that I still need to complete my mourning dress! Before I blog next, I must PROMISE to myself to do the following:

1. Re-gather the bodice to make a better fit
2. Add the waistband
3. Finish creating all piping
4. Start the armscye piping

Until next time everyone! Please leave a comment, I enjoy them very much!

~Kristen

Friday, February 8, 2013

Kristen: How to make Mourning Jewelry

Oh my goodness it has been a busy few weeks! With winter storms, paper deadlines, and squirmy students, I've found little time to play with my sewing/crafting. Fortunately I have been blessed with a snow day today! With my extra time I've decided to jump deeper into my research of hairwork, or mourning jewelry.
A beautiful example!

I am a firm believer that working only on one project at a time can be exhausting. Hairwork is certainly a field of study in itself, and eventually I'd like to add pieces to my etsy shop. First I must research! Today I gathered my tools in anticipation of what I hoped to be a successful day of crafting.
 Larissa, one of my fellow reenactors, gave me her hair to practice!

One of the first things I've noticed while researching hairwork is that several of the tools they used are not quite as common today. Gum arabic is now used for painting, and I wasn't exactly sure if I bought the right kind. Also, I bought a doll's curling iron, since the irons they used back then were actually heated over the fire (unlike our modern, deadly use of electric curling irons). 

The first technique I've tried is called a gimp. It is commonly used as flowers, but today I wanted to do a simple strand of embroidery thread to practice. I will post a more detailed group of pictures in the future, though this should give you an idea of what I am doing.
Note the thin wire gently wrapped around each thread loop

It looked very nice on the metal rod. Unfortunately it had to come OFF the metal rod. When I did so, of course it did not look quite so nice. *Sigh

What little I could salvage!

Not to be discouraged, I tried again with actual hair...and promptly made a large mess. I didn't take any photos because I then became discouraged. Quite discouraged. Extra discouraged. 

I was tempted to stop right there. One thing I've learned throughout this process is that I will make many mistakes, and practice makes perfect! So I set out to try the Prince Albert's curl, in honor of Queen Victoria's beloved husband.
I hope he wasn't watching...

I warmed up the doll curling iron by clipping it on another iron. I then burnt my hands considerably trying to curl the darn piece of hair. I'm quite a novice at hairdressing in general, so perhaps jumping straight to hair jewelry was ambitious. 

In any case, I moved on to glop on some gum arabic, which quickly took out the curl. I suppose there's a reason the directions say to "apply lightly." Thank you hairwork book...

How did they make that? How?!?

I decided to add a little bow to the piece, and back the hair with a light cotton. A few months ago I bought a shipment of little windowpane charms, so I stuck the finished piece in there.

It would take a saint to make this so well!

I will take it out later and replace it with a better piece before I give it to Larissa. This was my very first one, so I'm hoping the next will be an improvement. Before I finish, I should write down a few of my observations:

1. Be patient.
2. Hair is messy. It will move in EVERY direction.
3. You must have the proper tools, or nothing will work.
4. Plan on nothing working the first 10 times you try this.
5. Research is a process.

I will try to work on my hair jewelry more so that I may tack it on to my next post!

~Kristen

On My Bookshelf: December

December has been a really rough month. Between what happened in Oxford (not far from where I live...) and just the general pandemic issues,...